Short: This script can be used to automate the snapshot creation for DellEMC Isilon systems.
Veeam Backup & Replication NAS Backup
With Veeam bringing the new NAS backup functionality in the next main release, a few of my colleagues and myself decided to build some scripts to leverage one very cool feature.
In the advanced settings for the file share definition, you have the option to backup from various sources of the share.
First option is to Backup directly from the file share which might bring you into a situation where files are locked by other users and cannot be backed up during a job run. The other thing you might need to think about is more related to larger shares. If the job runs for a longer time, users might change files that still need to be processed. This will left you with a backup that is not exactly from the same time of all files.
The second option you have is to leverage VSS snapshots on the storage. In detail we are talking about RVSS (Remote Volume Shadow Copy Service) here. This function is implemented in some NAS storage systems in the SMB 3.0 already and can make life very easy when it comes to backup.
I will cover this topic in a future post, so let´s look at the third option now.
This third option gives you the cool feature to Backup from native storage snapshots.
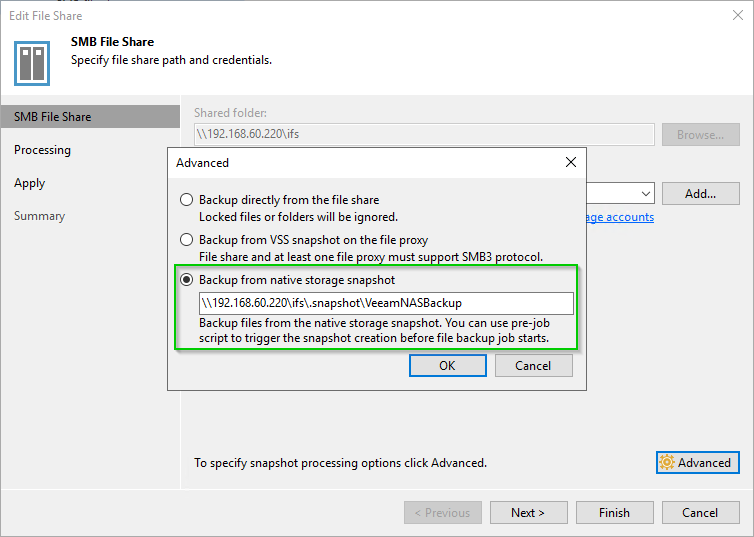
But what does this really mean?
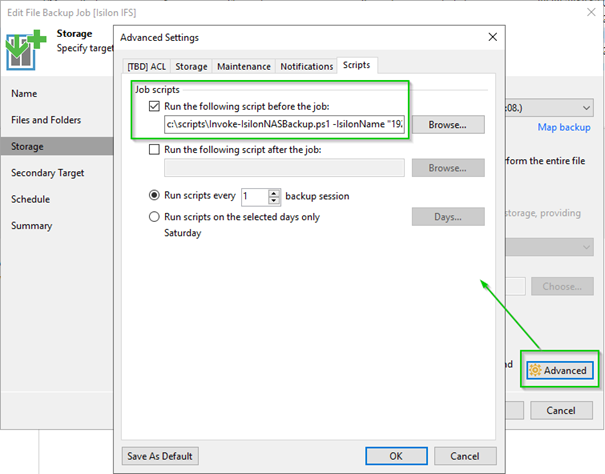
You can define an alternative path from where you want to drag the files from. This path will be a mounted snapshot in the most cases, and to prepare this you can run a pre-backup script in the backup job:
Every vendor builds it´s NAS storage systems differently, so what did I do to make use of this for Isilon systems? Keep on reading…
Prerequisites
First, I found the PowerShell module from Christopher Banck on github (https://github.com/vchrisb/Isilon-POSH) which actually uses the RestAPI of the Isilon to manage the system. Big kudos to him for creating that and honestly, I was really surprised that DellEMC is not providing a PowerShell integration by themselves.
Both of his modules, the IsilonPlatform and SSLValidation, need to be present on the system where you will run the scripts. In most cases this will be
C:\Program Files\WindowsPowerShell\ModulesSecond thing you need to think of it the user account the script runs with. Since this will be triggered by Veeam Backup & Replication, the context most likely will be the System user. To be able to use encrypted credentials in a xml file, this should be created with PSEXEC to have the decryption right for the System user. Marco Hostmann has written a nice little article on how to do this: https://horstmann.in/store-powershell-credentials-encrypted/
The Isilon Script
Once you are settled up with the basics, you can go ahead and start using a PowerShell script, in this case the one for Isilon I dropped here: https://github.com/wcbuerste/Veeam/tree/master/NAS/Isilon
This script creates a snapshot in a DellEMC Isilon system for the path of a defined SMB share. The snapshot is presented in the root subfolder .snapshots of the filesystem root.
In my case I´ll simply use the Isilon’s root folder ifs since I want to backup all subfolders from the same snapshot. Let´s have a look at the parameter you need to run the script:
IsilonName: With this parameter you specify the Isilon DNS name or IP
IsilonCluster: With this parameter you specify the clustername of the Isilon system
IsilonShare: With this parameter you secify the source SMB share
IsilonCredentialFile: This parameter is a filename of a saved credentials file for authentification
SnapshotName (optional): With this parameter you can change the default snapshotname “VeeamNASBackup” to your own name
IsilonSnapExpireDays (optional): Set the days when the snapshot should be expired. The default value is 2 days.
LogFile (optional): You can set your own path for log files from this script. Default path is the same VBR uses by default “C:\ProgramData\Veeam\Backup”
Knowing this now my call is looking like this in the backup job configuration:
.\Invoke-IsilonNASBackup.ps1 -IsilonName "192.168.60.220" -IsilonCluster "isilon01" -IsilonShare "ifs" -IsilonCredentialFile 'C:\Scripts\credential.xml' -IsilonSnapExpireDays "2"Functions
If you want to dig deeper, here are some words on the important bits.
function Set-IsilonSnapExpireDate
function Set-IsilonSnapExpireDate($IsilonSnapExpireDays) {
	#$IsilonSnapExpireDate = ((get-date -date (get-date).AddDays($IsilonSnapExpireDays) -UFormat %s)).split(',')[0]
	$IsilonSnapExpireDate = ((get-date -date ((get-date).ToUniversalTime()).AddDays(2) -UFormat %s)).split(',')[0]

	Write-Log -Info "Calculated the snapshot expiry date to $IsilonSnapExpireDate" -Status Info
	return($IsilonSnapExpireDate)
}
This is taking the IsilonSnapExpireDays parameter and adds it to the current timestamp. The return value is a decimal Unix style date format the Isilon need for the expiry date.
function Get-IsilonSharePath
function Get-IsilonSharePath($IsilonShare){
	Write-Log -Info "Getting the path value from $IsilonShare" -Status Info
	try {
		$objIsilonShare = Get-isiSmbShares | where {$_.Name -eq $IsilonShare}
		$IsilonSharePath = $objIsilonShare.path
		Write-Log -Info "Path for $IsilonShare is $IsilonSharePath" -Status Info
		return($IsilonSharePath)
		}
	catch {
		Write-Log -Info "$_" -Status Error
		Write-Log -Info "Getting path for $IsilonShare failed" -Status Error
		exit 1
	}
}
We need to know the path on where to mount the snapshot. So here the IsilonShare used to get the path value from the provided share name.
function Create-IsilonSnapShot
function Create-IsilonSnapShot($SnapshotName, $IsilonSharePath, $IsilonSnapExpireDate) {
	Write-Log -Info "Trying to create a new snapshot mount for $IsilonSharePath" -Status Info
	#check if there is a snapshot with the same name
	try {
		if(Get-isiSnapshot -name $SnapshotName) {
			Write-Log -Info "Existing snapshot found, trying to rename it" -Status Info
			#get the current time
			$dateAppendix = Get-Date -Format yyyy-mm-dd_HH-mm-ss
			try {
				#rename the current snapshot with the date appended
				$OldSnapshotName = $SnapshotName + "_" + $dateAppendix
				Set-isiSnapshot -name $SnapshotName -new_name $OldSnapshotName -Force
				Write-Log -Info "Snapshot renamed to $OldSnapshotName" -Status Info
			}
			catch {
				Write-Log -Info "$_" -Status Error
				Write-Log -Info "Renaming the old snapshot failed" -Status Error
				exit 1
			}
		}
	}
	catch {
		Write-Log -Info "No existing snapshot found" -Status Info
	}

	#create a new snapshot for the share
	try {
		New-isiSnapshots -name $SnapshotName -path "/ifs" -expires $IsilonSnapExpireDate
		Write-Log -Info "New snapshot named $SnapshotName created" -Status Info
	}
	catch {
		Write-Log -Info "$_" -Status Error
		Write-Log -Info "Snapshot creation failed" -Status Error
		exit 1
	}
}
This is actually where the main magic happens. First there is a check if a snapshot with the name from parameter SnapshotName exists. If yes, the existing snapshot will be renamed by attaching the actual timestamp.
When this is done or no snapshot with the same name exists, a new snapshot will be created and mounted to the desired path. Also, the snapshot will get the defined expiry date so that, if you don´t want to run a cleanup script after the backup, the snapshot won’t stay forever.
Conclusion
As you have learned now, the usage of a script for backing up NAS storages from snapshots with Veeam Backup & Replication can be a nice addition to simply accessing the files shares directly.
If you are searching something similar for NetApp systems, please head over to Marco again and find instructions and scripting there: https://horstmann.in/advanced-veeam-nas-backup/